
Task Summary
What you will learn
You will learn some basic HTML code used to produce a webpage and the reason HTML code is used.
How will you be assessed
You will complete and submit a single webpage containing text, various text styles, various colours, a table, a picture, a video.
You will learn some basic HTML code used to produce a webpage and the reason HTML code is used.
How will you be assessed
You will complete and submit a single webpage containing text, various text styles, various colours, a table, a picture, a video.
Activities
What is HTML and why do we use it?
If you remember during the last module we watch a video called "There and back again a packets tale" and remember that when we request a webpage by typing the website address in the URL, the request is sent to the location where the website is hosted, this can often be on the other side of the world. When the website host receives your request they send the website back to you via a network of cables.
These websites are coded, mainly in HTML, this is to aid the speed of the data and to ensure it is in a format that can be understood by the receiver.
Rather than send lots of data, HTML code tells your computer to use features it already has installed, for example; rather than sending all the details of a Text Font, the code is sent to tell your computer which pre-installed Font to use.
Key reasons for HTML:
You can view the code to websites in most browsers by pressing ctrl+U. Try it on your favorite website.
If you remember during the last module we watch a video called "There and back again a packets tale" and remember that when we request a webpage by typing the website address in the URL, the request is sent to the location where the website is hosted, this can often be on the other side of the world. When the website host receives your request they send the website back to you via a network of cables.
These websites are coded, mainly in HTML, this is to aid the speed of the data and to ensure it is in a format that can be understood by the receiver.
Rather than send lots of data, HTML code tells your computer to use features it already has installed, for example; rather than sending all the details of a Text Font, the code is sent to tell your computer which pre-installed Font to use.
Key reasons for HTML:
- To speedup data transfer by reducing the amount of data needed.
- To ensure the data is in a format that the receiver can use.
You can view the code to websites in most browsers by pressing ctrl+U. Try it on your favorite website.
2: Lets get Coding
First things first: Where you will be saving your work, set up a new folder called "Mywebsite" (or your preferred name). Optional: You may also want to set up a further sub-folder called "Website Media" (or your preferred name) this will be a place to save any pictures or videos for your website. It is important that all files are saved in this folder and this folder is accessible from where ever you want to view/edit your site.
One of the first things you will notice when you write your first code is the TAGS. Tags are what are used to insert the different parts of a web page.
With tags there are two basic rules: We must open and close tags
Example: To open a tag we simply type:
<html>
Example: To close a tag we type:
</html>
Can you spot the difference?
|
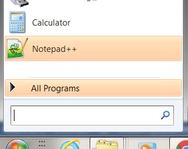
Now lets type our first piece of code and become familiar with 4 new tags. We will use Notepad ++ to write our code. Notepad ++ is different from Notepad because it will give prompts and check the code for errors. If you do not have Notepad ++ on your computer it is available for free download.
|
|
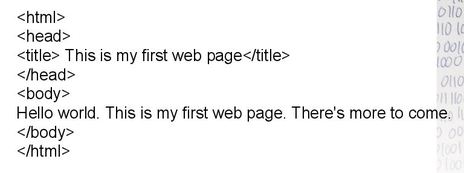
Open Notepad ++ and select "New" from the "File" menu. Type in the following code (from the left picture) to start your first website.
|
|
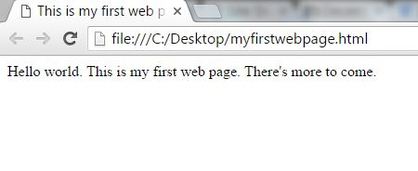
When you have finished entering the code save the file as myfirstwebpage.html Make sure you put the .html at the end of the name!
Find where you saved the file and open it to see how it looks in your web browser. It should look like the above right picture..
What each Tag does:
<HTML> = Tells the web browser what code the site is written in. Some sites contain more than one programming language.
<head> = Tells the browser to place the text on the head/tab of the webpage.
<title> = Tells the web browser that this is the title of the website. (You will notice this appears on the browser head/tab, this is because in your code it is in-between a head tag).
<body> = This tells the web browser that anything in between the Body tags should be displayed in the web browser.
3. Adding some style
Now you have your first webpage working lets add some more text and some different styles by using some of the Tags below. Use the same technique when using the Tags.
Paragraph <p>
Underline <u>
Bold <b>
Italic <i>
Unordered List <ul>
Header Styles <h1> to <h6> (Six different Headers)
Center <center>
Line Break <br> Note: with this one you do not need to follow the rule of having and opening and closing Tag
Save a screenshot of you code and a screenshot of how your webpage looks in your browser and save both screenshots in an appropriate place for later use.
4: Adding some colour
Remember when adding colour the the text should not conflict with the background colour, you should be able to see the text clearly. Try not to use to many colour on one page.
To add colour to the text try this:
<p style="color:red">
This is my first paragraph in Red
<p/>
Now try some other colours.
To add colour to the background try this:
Replace to first body tag with: <body style="background-color:lightgrey;">
Now try some other colours.
5: Now add a picture
The code below gives an example of how to add an image. At this stage it starts to get important about managing your files and where they are saved. If you move images or the location of where they are saved is inaccessible then the image will not load on your site, you would then get the alternative message displayed.
Inserting an image: Your path/location of the image will be different from the example below. You will need to copy the location that your image is saved. Copy the Path (location) where your image is saved, include the image filename and extension (extension: for example .jpg).
Type the line of code below and replace the location and filename (highlighted in green) with your own details:
<img src="C:\mywebsite\website media\myimage.png" alt="My Image" />
If you want to set the size of your image you need to add a bit more to your code:
<img src="C:\mywebsite\website media\myimage.png" alt="My Image" width="200" height="150"/>
6: Now add a video
Note: This will not work in some browsers. Try this in Internet Explorer.
Inserting a video: The same as when you inserted an image; your path/location of the video will be different from the example below. You will need to copy the location that your image is saved. Copy the Path (location) where your image is saved, include the video filename and extension (extension: for example .wmv).
Only certain video file types will work with this, such as .swf .mwv .mov .mpeg
<embed src="C:\mywebsite\website media\wildlife.wmv" width="200" height="200" />
You could also embed a video from sites such as Youtube. To do this right click on the video in Youtube and select "Copy embed code"
Paste the code into your HTML document. The code should look a bit like this:
<iframe width="854" height="480" src="https://www.youtube.com/embed/-evuKPEp3KE" frameborder="0" allowfullscreen></iframe>
Key Terminology
- User-Friendly
- Comment code
- SEO - Search Engine Optimisation
- HTML - Hyper Text Markup Language
- CSS - Cascading Style Sheets
- Corporate Design
- Hyperlinks
- WYSIWYG
Assessment Task 2
Task: Using the Progress Log attachment below, complete the Progress tables by adding screenshots of your code and site as it looks in your web browser and answer the questions. This Progress Log is designed to record your progress over a four week period and should be submitted for making when all activities in this section are complete.
| l1_progress_log.docx |
You need to submit the file you have created. Submit the file on Dashboard.
Going for Gold
Now try improving your website. Below is more information on how to use colours and how to use tables. You could also visit ... for more good ideas on HTML code you could use to improve your webpage.
More on colours:
Colour is represented by a Hexidecimal code; for example #ff0000 is pure Red. Some other colours are listed below. You could also visit http://html-color-codes.info_/ and select a colour from the chart and it will give you the hex code for that colour.
Light Blue #81bef7
Dark Blue #0404b4
Red #ff0000 because this is pure red you can simply type "red"
Yellow #ffff00
Orange #ff8000
White #ffffff
Light Green #9ff781
Dark Green #04b404
Purple #bf00ff
Adding tables:
Tables are often used in webpages to help organise and space work out neatly. It is also easy to set a table to automatically adjust to the size of any web browser.
An example of code for a table:
